
Older versions of the Kuntze analyzer may require a firmware update. This article covers both legacy platforms. The menu workflow is similar; the physical access to the SD card is different.
| Topic | Krypton® Multi | Krypton® DIS |
|---|---|---|
| SD card location | In the lid assembly (snap-on lid) | On the rear of the analyzer |
| Access | Open lid; push SD in to release | Remove 4 corner screws; turn unit over |
When requesting firmware, tell support your model (Multi or DIS), serial number, and version under Main Screen > System > Info.
Obtaining firmware
Firmware is not offered as a public download in this article. Contact techsupport@kuntze.com for the latest approved package for your Multi or DIS unit.
With partner access, use the Partner Portal — Kuntze Instruments.
Note: Unzip the package on your PC before copying files to the SD card. Use only firmware approved by Kuntze for your model.
Video tutorial
The video shows Krypton® Multi lid access. For Krypton® DIS, follow the DIS procedure and the two reference figures (rear screws and SD slot).
Direct link: https://youtu.be/M9HYCYvYuAI
Krypton® Multi
- IMPORTANT: Record settings (controllers, mA outputs, ASR, alarms, relays). Restore manually after update. Summary: Main Menu > System > Info > Settings.
- Power off.
- Remove the blue or black SD card in the lid (push in gently). See How to Open and Close the Krypton® Multi lid.
- On a PC, delete all files on the SD card.
- Copy all files from the firmware folder onto the SD card; eject safely.
- Reinstall SD card; power on (firmware load should start automatically).
- IMPORTANT: Factory reset after load: Main Screen > System > Reset > Okay.
- Check version: Main Screen > System > Info.
- Re-enter settings from step 1.
Krypton® DIS
Krypton® DIS does not use the snap-on lid for the SD card. The card is on the back. Unmount the analyzer from the wall if you need clearance.
- IMPORTANT: Record settings (controllers, mA outputs, ASR, alarms, relays). Restore manually after update. Summary: Main Menu > System > Info > Settings.
- Power off.
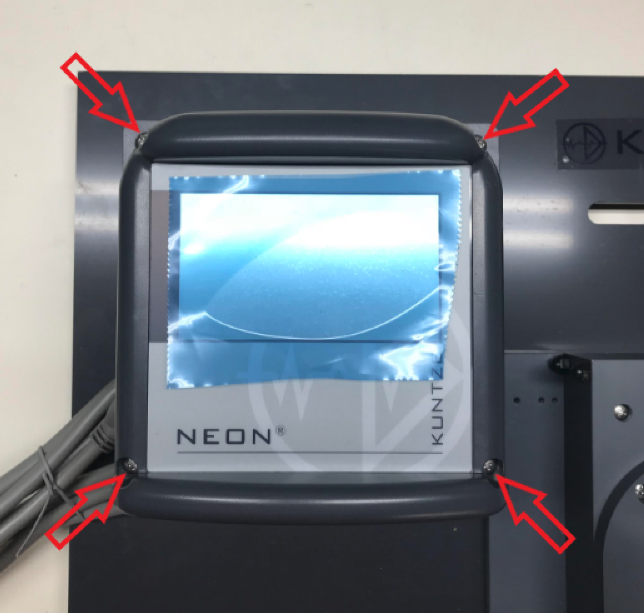
- Remove the four corner screws and turn the instrument over carefully.
Figure 1 — corner screws for rear access.
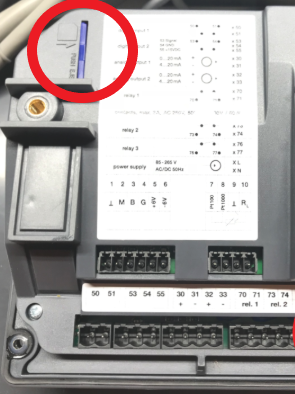
- Remove the blue or black SD card on the rear (push in gently).
Figure 2 — SD card on back of Krypton® DIS.
- On a PC, delete all files on the SD card.
- Copy all files from the DIS firmware folder onto the SD card; eject safely.
- Reinsert SD in the same rear slot (push in gently until seated).
- Power on (firmware load should start automatically).
- IMPORTANT: Factory reset after load: Main Screen > System > Reset > Okay.
- Check version: Main Screen > System > Info.
- Re-enter settings from step 1.
Important notes
- Do not interrupt power during firmware transfer.
- Multi and DIS use different firmware packages — do not mix files.
- Communication errors often clear after a successful update and factory reset.
Related Articles
Krypton® Multi
- How to Open and Close the Krypton® Multi lid
- Factory Reset - Krypton® Multi
- Save/Load Settings — Krypton® Multi / Krypton® DIS & DIS (Total)
Comments
0 comments
Please sign in to leave a comment.